
Showing posts with label techniques. Show all posts
Showing posts with label techniques. Show all posts
Wednesday, June 24, 2015
Hey, It's a Little Early for Christmas in July, Isn't It?
It is early to mention Christmas and holiday stuff, but since it's a class I thought probably earlier is better! I will be teaching "Mod Merry" on September 12th at Fancy Stitches. Ghosts are welcome if you can't make it there! If you love bling and fun stitches, this is the class for you!


Saturday, June 6, 2015
Spooky Saturday!
More cutie than spooky really! I wanted to share two great stitched Halloween designs, the first being from Mary at the Owl Stitchery blog. She had the fantastic idea of adding a checked border to my Halloween Night Collage. I love it! Really sets off the design nicely, I'm kind of wishing I had actually painted a border on the original canvas now! Great work Mary! Read more about it on her blog here.


This is my Halloween Sampler Cone stitched by Jennifer T. Can't wait to see it again when it comes back from finishing rolled up into its cone shape and loaded with goodies and embellishments!

It's needlepoint, so it's never too early to be stitching for Halloween or for Christmas either! I'm working on a series of ornaments right now. Happy Stitching!
Saturday, May 9, 2015
Meadowlark Cuff Bracelet in May/June Needlepoint Now
Meadowlark Cuff, the latest in my series of cuff bracelets for Needlepoint Now magazine appears in the current issue, which should already be on its way to your mailboxes and local shops. Here are are some detail photos for you to help you along the way to stitching it!
This is the completed design, flat and before finishing:

This is a detail of the crystal filagree embellishments. It seems that Swarovski has discontinued the filagree in the center motif. The round ones are still available and you could easily add one of those to the center, or substitute any pretty "sparkly" of your choosing that fits the space.


And here it is as finished!

Wednesday, February 11, 2015
Winter Waterfall Bracelet in the January 2015 Issue of Needlepoint Now

It utilizes one of my all time favorite techniques, Bargello! So fun and so quick to stitch and of course, it sparkles too! Lots of FyreWerks metallics and I added a touch of Swarovski crystal bling as well. Here is a detail photo of the design while it was still under construction:

Hope you may find this helpful if you are stitching the design, although I doubt you'll need it as it is so easy to do!
Here's a look at it in the magazine, with the wonderful styling you expect from Needlepoint Now:

Hope you will enjoy stitching this, and as always, if you have questions please contact me here at the blog. Happy Stitching!
Friday, January 23, 2015
Finally Caught Up On Mod Ornaments!
So much has happened so far this year since my last post on the 1st to get you all caught up on! I went to the TNNA trade show on the weekend of the 10th and it was a fabulous show where I got to hang out with my friends at Needlepoint Now and many others who I only get to see at these shows. Unfortunately, I came home with more than just fond memories, I picked up the flu as well! As bad as it was to spend the next week sick, I was more upset that I had broken a multi-year run of perfect health. I have not even caught a cold since 2008, can you believe it? I'm finally feeling a little better and have some stitching progress to show you.
Over the holidays I finally had a chance to get started stitching Mod Ornaments, the Sandra Arthur Mystery class that started last November. Now that I'm actually stitching it, I can really appreciate all that Sandy has done with the design. She offers you many, many options to personalize your canvas as you see fit, especially as it comes to one's preferred level of sparkle and bling! I am definitely a more is better sort of person, so I took every option to add even more shine!
Here is my canvas so far, 95% done with Lessons 1 & 2, four ornaments are stitched as are the green beads:

For the pink ornament, Sandy had found the most perfect shade of pink seed bead for the body of the ornament-- it's gorgeous! I changed it up a bit with my center band though, I only did two of the colors with the Herringbone stitch and filled in the orange area with cross stitches.
For the orange ornament, I again took one of Sandy's options and stitched the body of the ornament in a mixture of silk and metallic rather than in the solid silk. I also added more of those great pink seed beads to the pink bands. I put green sequins behind the beads that dot the center band.

When it came time to add the Swarovski Margarita flowers to the green beads, I was surprised to find I didn't have the correct size crystal on hand! I kind of look at these items as "staples" so it was kind of like going to the pantry and not finding any flour! However, I did have them in the right size in Peridot Green AB oddly enough and so I used those:
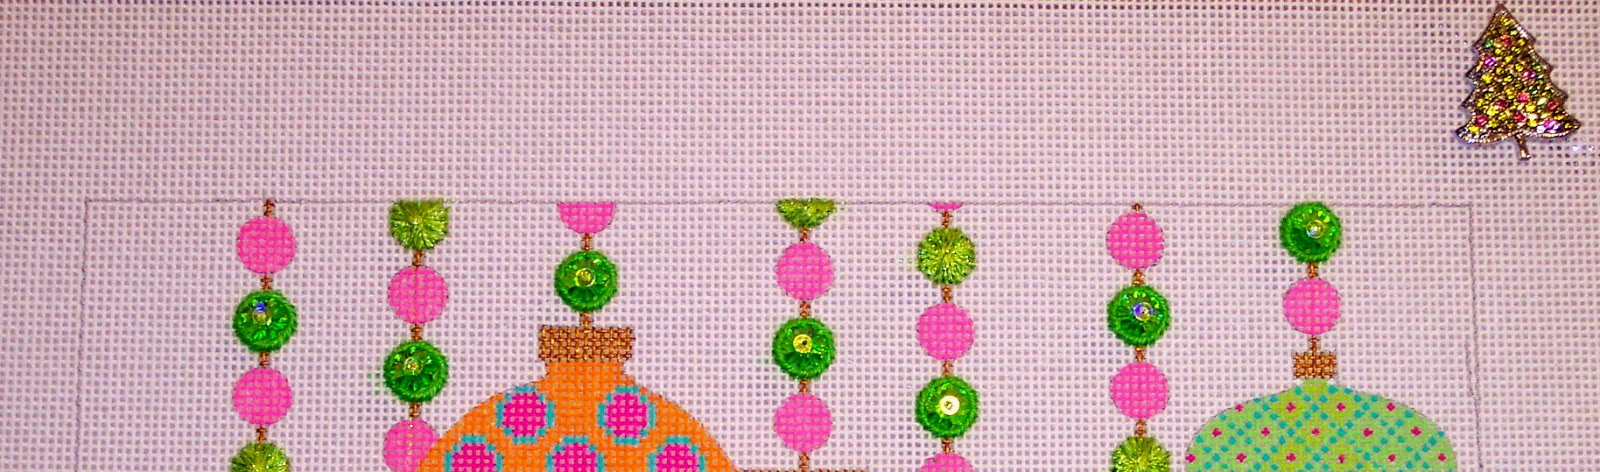
Now I've mentioned I'm a "more is better" type, so I attached my crystals with a matching bead AND a 2.5mm green holographic sequin on top! Yes, it did make it even more sparkly!

For the big pink ornament, I actually used less bling than Sandy did, she has Swarovski Crystal sequins on her center medallions, I used some too but mine are smaller, I set them in the center of these great green leaf-shaped sequins. The little blue dots are also pearlized finish sequins attached with beads.

For the little ornament in the corner, I again went with the "more sparkle" option by using one of the newest colors of FyreWerks for the smaller cross stitches. Also, I thought the beads didn't stand out enough on their own, so I put these tiny 2mm flower shaped sequins behind them, definitely giving them more prescence without being too much.

So now I'm on to the next Lesson, where we will be adding a Peyote stitched band to the big center ornament. Sandy showed me a photo when we were at Market and I can tell you it is FABULOUS! Here is a photo of my three colors of Delica beads, as well as the rest of my Margarita beads that I still need to attach:

That's all for now, I'll be back next week with some new finishing photos!
Saturday, August 30, 2014
Another Month, Another Clue
Another Stitching Games clue, that is! This month's clue was "apple" and it reminded me of an old song lyric that goes "You're the apple of my eye, you're the moon in my sky", so naturally then I stitched my moon and sky. The moon is stitched with an ivory-color Snow, the sky is a random long stitch with a really great overdye and the witch herself is this wonderful sequin I found from my favorite sequin source: Cartwright's. I'm so happy I finally had the chance to use one, it really worked well I think.
Hope you all are having a great long weekend and getting lots of stitching time in!

Hope you all are having a great long weekend and getting lots of stitching time in!
Thursday, April 3, 2014
Stitching Games Update-- the March Clue
Last month was a typical one for me when it comes to the Stitching Games over on Stitcherie-- I completed my clue late in the evening on March 31st, coming in among the very last to get my clue stitched for that month. Better late than never though, and having a deadline is essential for a procrastinator like me! The clue for March was "Time Warp", which put many of us in mind of the song from the Rocky Horror Picture Show. With the Rocky Horror association, it wasn't hard for me to connect my two spooky flower faces with a certain character from the movie-- you see the resemblance, right? :)

I used an Ecru color Vineyard Silk to Basketweave the faces, stitching the face details in with FyreWerks and making the eyes with layers of sequins and beads. Fast and fun!
The clue for this month is "bacon". It will be fun to see what those with canvases with no element of food whatsoever will come up with. For me, Ms. Literal, I will most likely be doing something with the cauldron and the brew bubbling inside. I will of course post a photo when done, but naturally, don't expect it until around April 30th! :)
Friday, March 14, 2014
In the Classroom with Tony Minieri
Thanks to my friend and stitch guide designer extraordinaire Cynthia Thomas, I had the opportunity last weekend to take a canvas enhancement class with Tony Minieri. It was fabulous to finally meet and learn from Tony, I think I may be one of the last serious stitchers in the US that still somehow had never attended one of his workshops!
I had a terrific experience and Tony is a genius when it comes to picking threads and stitches for a canvas. Plus, he is a stitching master-- every stitch, every technique, he knows them inside out and he of course is an amazing stitcher himself. He knows his needlework history too-- it was great to chat with him about one of my stitching heroes, Mary Rhodes.
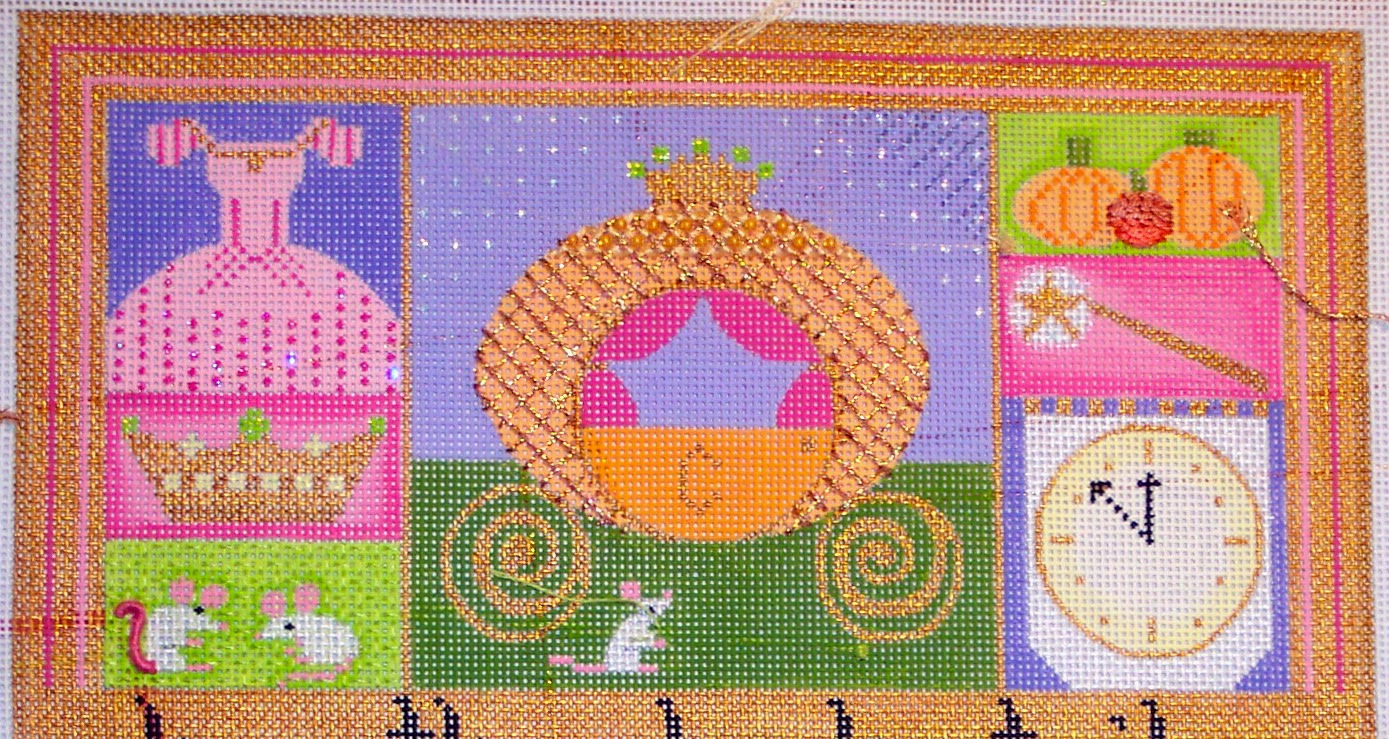
The canvas I brought to class was my Cinderella's Magical Night canvas:



I had a terrific experience and Tony is a genius when it comes to picking threads and stitches for a canvas. Plus, he is a stitching master-- every stitch, every technique, he knows them inside out and he of course is an amazing stitcher himself. He knows his needlework history too-- it was great to chat with him about one of my stitching heroes, Mary Rhodes.
The canvas I brought to class was my Cinderella's Magical Night canvas:
As usual for me, I got very little actual stitching done in class. I like to jump around the canvas and work all the areas from the stitch guide that I had questions about. Tony demonstrated for me how to do Repousse', which is how the little mouse tail on the left is stitched. I also learned Raised Stem Band, which is demonstrated on the little pumpkin in the middle on the upper right. I also stitched as much of the carriage as I could-- it is a 3-layer confection of metallic, silk and beads done in a Trellis Stitch Variation.
The last day of class had me working the sky area in the lower right and part of the border:
Cynthia was working on a companion piece to this canvas, the Carriage. She was able to practically finish this in class, having gotten all the way to the border! The best parts are still to come, as there are jewels to add to the crown, golden wheels to be couched on over the grass and best of all, the door gets applied in a dimensional appliqué technique. I just cannot wait to see this when Cindy gets it done, be sure to check back here for pictures! Good thing Cindy is a very fast stitcher.
If you have a chance to take a class with Tony, don't pass it up! He is definitely as good as he sounds. Be sure to check into his classes for his counted-work pieces as well-- he brought one of the various colors of his Patchouli design to class and it was amazing, can't wait for my next opportunity to take that class!
Thanks for stopping by!
Tuesday, March 4, 2014
Winter Cheer
The concept of "Winter Cheer" is probably a lost cause at this point in this particularly long winter. I find myself house bound today even though I am in Houston, Texas! We are in the middle of an ice storm as I write this and I don't dare to try to take my daily walk as I have had enough of slipping and falling on ice (having lived the past few years in New England) to last the rest of my life!

Looking out my windows, though, the icicles on the bird feeder aren't stopping my resident cardinals from getting their breakfast and that reminded me of a recent finishing photo that was shared with me:
This is the first one of my "Joy Cardinal" canvas that I have ever seen stitched and I can tell you right now it is already one of my favorites of all time! This is a perfect example of what a really gifted and creative stitcher can do with a really small canvas. The stitcher, Carolyn B., stitched it for her daughter as a gift after having "stolen" it from the daughter's stash, lol! Wish someone would steal some of my stash like that! Great work, Carolyn, and thanks so much to daughter Jennifer for sharing her photo.
Hope this has brought some "Joy" to your winter as it has mine, see you next time!
Wednesday, November 20, 2013
Things to Remember About Memory Thread
Reading the Bedecked and Beadazzled newsletter this month I was reminded of just how fun it is to work with DMC Memory Thread! The "Technique of the Month" for November is applications with Memory Thread and you should definitely check it out (if you haven't already), click here.
This is the first project where I used Memory Thread, on my Floating Hearts canvas. This was a featured project in the May 2010 of Needlepoint Now. I needed to "clean up" the edges of my hearts because of all the compensated stitches and Memory Thread couched around the hearts fit the bill perfectly! As you can see, you can couch it singly or with two or more strands side by side.


And here is the final layer with the Frosty Rays stitched over the top of the Memory Thread:

This is the first project where I used Memory Thread, on my Floating Hearts canvas. This was a featured project in the May 2010 of Needlepoint Now. I needed to "clean up" the edges of my hearts because of all the compensated stitches and Memory Thread couched around the hearts fit the bill perfectly! As you can see, you can couch it singly or with two or more strands side by side.

It worked fabulously for the smaller companion design, Floating Flowers as well!

This is a detail of a flower from my Wedding Cake Slice, where I used Memory Thread for both the outside edge and for four of the petals too:

The Cake Slice as completed:

Leave it to Ruth Schmuff to find a really innovative use for Memory Thread rather than just outlining with it-- she used it to pad the candy canes on my CandyLand Christmas canvas. Here is the first layer:

And here is the final layer with the Frosty Rays stitched over the top of the Memory Thread:

Great effect, right? I love how it makes it both dimensional and gives it that nice, clean edge as well. See more of the magic Ruth worked on this canvas here.
Hope this has been informational and inspirational too! Until next time, Happy Stitching!
Monday, October 14, 2013
Before and After
If you have a good memory, you may recognize the designs I'm featuring today from earlier posts, where they were stitched, but not finished. I am always thrilled to see completed stitches, but even more so to see them again after their visit with the finisher.
This is my Witch Hat House, stitched by Karen Barras and finished by her also! She made and stitched a really great cording around the edges, and added a little 'L'- shaped plexiglass strip onto the back, making it into an easel back stand up. The plexi strip is cleverly fitted into a hand sewn pocket!

I was so thrilled with these two purse-insert canvases, stitched by Alison Brennan that I could not wait to show them off here last year:


And here they are now, back from finisher Kristine Kingston! Who says that they had to be purse inserts? Even though they were painted sized for the Lee Leather bags, they work great as pillow fronts too! Love them, great job girls!


Hope you all had a great Columbus Day weekend, see you next time!
Thursday, September 12, 2013
New Design "Halloween Birdhouse"
I am very pleased to share my newest design, appearing in the September/October 2013 issue of Needlepoint Now. This is my first foray into creating a line-drawn canvas design. I have always enjoyed this type of design for it's "coloring book" appeal-- filling in the lines with fun colors and patterns, what could be more fun? I hope you will enjoy stitching it as much as I did!
Here is the whole design, flat, before the finishing process:

And here it is finished! As you may have noticed from the line of chain stitches surrounding the design, like my previous "Spring Garden" series, this one too is a project you can finish yourself should you choose. I finished this one as a Cracker ornament, albeit it is a bit larger than most, the stitched area is 3" x 4, giving you a finished piece somewhere between Cracker and Roll Up in size.

Here's another little detail-- I put pom-poms into the ends to fluff out the ruffle and add a little surprise touch:

Here's a sneak peek at the materials list, courtesy of the magazine:

And here are detail photos for your stitching reference-- the center birdhouse:

And the little Witchy-bird, stitched in Kreinik's gorgeous peacock color metallic ribbon:

Detail of the roof and dormer. Rainbow Gallery's FyreWerks makes for a great glass in the windows illusion:

Detail of the flowers, created with layered sequins, beads and metallics:

The Jack O'Lantern is created with the Basketweave Beading technique using Delica beads:

Finishing details are included in the article, and couldn't be simpler! Essentially, you are making a tube that will slide over another tube, made of fabric and stuffed like a little mini bolster pillow. Afterwards, you can embellish them both as much as you would like!
Hope you have enjoyed this preview. Please contact me if you have any questions about stitching or finishing this design and as always, Happy Stitching!
Thursday, May 23, 2013
Gardening Tips

In my last post, I shared with you my source for the best way to do Chain Stitch, which is the technique I use for assembling all of the Spring Garden series projects. Here is a photo of the tag in the finishing process with one of the sides joined together:

Here is a photo of the Humbug, illustrating how the Chain stitch border is used to join the edges with Whip stitch, sliding the needle cleanly under the pair of Chain stitches:

This is a really easy way to self-finish small items-- I hope you will give it a try!
Speaking of Needlepoint Now projects, here is a close up photo of Prismatic Quartet, which is available as a reprint now that the original magazine issues it appeared in have sold out.

It was my hope when I designed this piece that it would inspire stitchers to raid their stash and put their own spin on the original design. I was extremely happy to see this photo in a recent edition of the Needlepoint Now newsletter-- Ruth Wallis stitched her Prismatic Quartet as a Duet, using mostly stash threads and adding her own borders to the outside edges. I love the result, it came out fantastic, don't you agree?

Great work Ruth, thanks so much for sharing! If anyone else out there has any photos of my designs, finished or not, please do send them on to me, I love showing off your work!
Finally, I'd like to show off my ad in the recent issue of Needlepoint Now, wonderfully put together for me by my distributor, Ruth Schmuff. It features designs from my 2013 collection, Cardinal Joy, Mod Merry and Floral Collage:

That's it for now, next time I'll be back with some peeks at what will be new for Summer 2013! Thanks for looking and Happy Stitching!
Subscribe to:
Posts (Atom)